> ## Documentation Index
> Fetch the complete documentation index at: https://cometchat-22654f5b-docs-rn-guide-message-privately.mintlify.site/llms.txt
> Use this file to discover all available pages before exploring further.
# Expo Integration
> Add CometChat to an Expo app using development builds in 5 steps: create project, install, init, login, render.
| Field | Value |
| ---------------- | ------------------------------------------------------------------------------------- |
| Package | `@cometchat/chat-uikit-react-native` |
| Peer deps | `expo` SDK 50+, `@cometchat/chat-sdk-react-native` |
| Init | `CometChatUIKit.init(UIKitSettings)` — must resolve before `login()` |
| Login | `CometChatUIKit.login({ uid })` — must resolve before rendering components |
| Order | `init()` → `login()` → render. Breaking this order = blank screen |
| Auth Key | Dev/testing only. Use Auth Token in production |
| Expo Go | Not supported — use development builds |
| Other frameworks | [React Native CLI](/ui-kit/react-native/react-native-cli-integration) |
| AI Skills | `npx @cometchat/skills add` — [GitHub](https://github.com/cometchat/cometchat-skills) |
This guide walks you through adding CometChat to an Expo app using development builds. By the end you'll have a working chat UI.
Expo Go is not supported. The CometChat UI Kit requires custom native modules, so you must use [development builds](https://docs.expo.dev/develop/development-builds/introduction/).
***
## Integrate with AI Coding Agents
Skip the manual steps — use [CometChat Skills](https://github.com/cometchat/cometchat-skills) to integrate via your AI coding agent. Your agent has a short conversation with you to understand your project and chat requirements, then writes production-grade integration code tailored to the files you already have.
```bash theme={null}
npx @cometchat/skills add
```
Use `--ide ` to target a specific IDE (e.g. `--ide cursor`), or `--ide all` for all supported IDEs.
Then in your IDE:
```
/cometchat add chat to my app
```
The skill detects your Expo setup (managed workflow + Expo Router), env prefix (`EXPO_PUBLIC_`), and existing auth system. It onboards you to CometChat directly in the terminal — signup, login, and app creation all via the CLI. It reads your screens, nav, and components before proposing a placement, shows the plan, and waits for your approval before writing code.
After the first integration, re-run `/cometchat` to access the iteration menu: theme presets, 40+ features, component customization, push notifications, production auth, user management, and diagnostics.
Works with Claude Code, Cursor, Codex, VS Code Copilot, Windsurf, Cline, Kiro, and [30+ more agents](https://github.com/cometchat/cometchat-skills).
***
## Prerequisites
You need three things from the [CometChat Dashboard](https://app.cometchat.com/):
| Credential | Where to find it |
| ---------- | ---------------------------------------------------------- |
| App ID | Dashboard → Your App → Credentials |
| Auth Key | Dashboard → Your App → Credentials |
| Region | Dashboard → Your App → Credentials (e.g. `us`, `eu`, `in`) |
You also need:
* Node.js (v16+) and npm/yarn installed
* Expo CLI installed (`npm install -g expo-cli`)
* Xcode (for iOS) and Android Studio (for Android) for development builds
Auth Key is for development only. In production, generate Auth Tokens server-side via the [REST API](/rest-api/chat-apis) and use [`loginWithAuthToken()`](/ui-kit/react-native/methods#how-to-login-a-user-with-auth-token). Never ship Auth Keys in client code.
***
## Step 1 — Create an Expo Project
```bash theme={null}
npx create-expo-app@latest MyApp --template blank-typescript
cd MyApp
```
***
## Step 2 — Install the UI Kit
```bash theme={null}
npm install @cometchat/chat-uikit-react-native
```
Install the SDK and peer dependencies:
```bash theme={null}
npm install @cometchat/chat-sdk-react-native
npm install @react-native-community/datetimepicker
npm install @react-native-clipboard/clipboard
npm install react-native-svg
npm install react-native-video
npm install dayjs
npm install @react-native-async-storage/async-storage
npm install react-native-gesture-handler
npm install react-native-localize
npm install react-native-safe-area-context
npm install punycode
```
### Configure app.json
Add required permissions for camera and microphone:
```json title="app.json" theme={null}
{
"expo": {
"ios": {
"infoPlist": {
"NSCameraUsageDescription": "Camera access for video calls",
"NSMicrophoneUsageDescription": "Microphone access for voice/video calls"
}
},
"android": {
"permissions": [
"android.permission.INTERNET",
"android.permission.CAMERA",
"android.permission.MODIFY_AUDIO_SETTINGS",
"android.permission.RECORD_AUDIO",
"android.permission.ACCESS_NETWORK_STATE",
"android.permission.WRITE_EXTERNAL_STORAGE",
"android.permission.READ_EXTERNAL_STORAGE",
"android.permission.VIBRATE"
]
}
}
}
```
### Optional: Install Calling SDK
To enable voice/video calling:
```bash theme={null}
npm install @cometchat/calls-sdk-react-native
npm install @react-native-community/netinfo
npm install react-native-background-timer
npm install react-native-callstats
npm install react-native-webrtc
```
***
## Step 3 — Initialize CometChat
`init()` must resolve before you call `login()`. If you call `login()` before init completes, it will fail silently.
```tsx theme={null}
import { CometChatUIKit, UIKitSettings } from "@cometchat/chat-uikit-react-native";
import { CometChat } from "@cometchat/chat-sdk-react-native";
const COMETCHAT_CONSTANTS = {
APP_ID: "APP_ID", // Replace with your App ID
REGION: "REGION", // Replace with your Region
AUTH_KEY: "AUTH_KEY", // Replace with your Auth Key (dev only)
};
const uiKitSettings: UIKitSettings = {
appId: COMETCHAT_CONSTANTS.APP_ID,
authKey: COMETCHAT_CONSTANTS.AUTH_KEY,
region: COMETCHAT_CONSTANTS.REGION,
subscriptionType: CometChat.AppSettings.SUBSCRIPTION_TYPE_ALL_USERS as UIKitSettings["subscriptionType"],
};
CometChatUIKit.init(uiKitSettings)
.then(() => {
console.log("CometChat UI Kit initialized successfully.");
})
.catch((error) => {
console.error("CometChat UI Kit initialization failed:", error);
});
```
```jsx theme={null}
import { CometChatUIKit } from "@cometchat/chat-uikit-react-native";
import { CometChat } from "@cometchat/chat-sdk-react-native";
const COMETCHAT_CONSTANTS = {
APP_ID: "APP_ID", // Replace with your App ID
REGION: "REGION", // Replace with your Region
AUTH_KEY: "AUTH_KEY", // Replace with your Auth Key (dev only)
};
const uiKitSettings = {
appId: COMETCHAT_CONSTANTS.APP_ID,
authKey: COMETCHAT_CONSTANTS.AUTH_KEY,
region: COMETCHAT_CONSTANTS.REGION,
subscriptionType: CometChat.AppSettings.SUBSCRIPTION_TYPE_ALL_USERS,
};
CometChatUIKit.init(uiKitSettings)
.then(() => {
console.log("CometChat UI Kit initialized successfully.");
})
.catch((error) => {
console.error("CometChat UI Kit initialization failed:", error);
});
```
***
## Step 4 — Login
After init resolves, log the user in. For development, use one of the pre-created test UIDs:
`cometchat-uid-1` · `cometchat-uid-2` · `cometchat-uid-3` · `cometchat-uid-4` · `cometchat-uid-5`
```tsx theme={null}
const UID = "cometchat-uid-1"; // Replace with your actual UID
CometChatUIKit.login({ uid: UID })
.then((user: CometChat.User) => {
console.log("Login Successful:", user.getName());
})
.catch((error) => {
console.error("Login failed:", error);
});
```
```jsx theme={null}
const UID = "cometchat-uid-1"; // Replace with your actual UID
CometChatUIKit.login({ uid: UID })
.then((user) => {
console.log("Login Successful:", user.getName());
})
.catch((error) => {
console.error("Login failed:", error);
});
```
For production, use [`loginWithAuthToken()`](/ui-kit/react-native/methods#how-to-login-a-user-with-auth-token) instead of Auth Key. Generate tokens server-side via the REST API.
***
## Step 5 — Choose a Chat Experience
Integrate a conversation view that suits your app's UX. Each option below includes a step-by-step guide.
### Conversation List + Message View
List of conversations on one screen, tap to open messages. Standard mobile chat pattern.
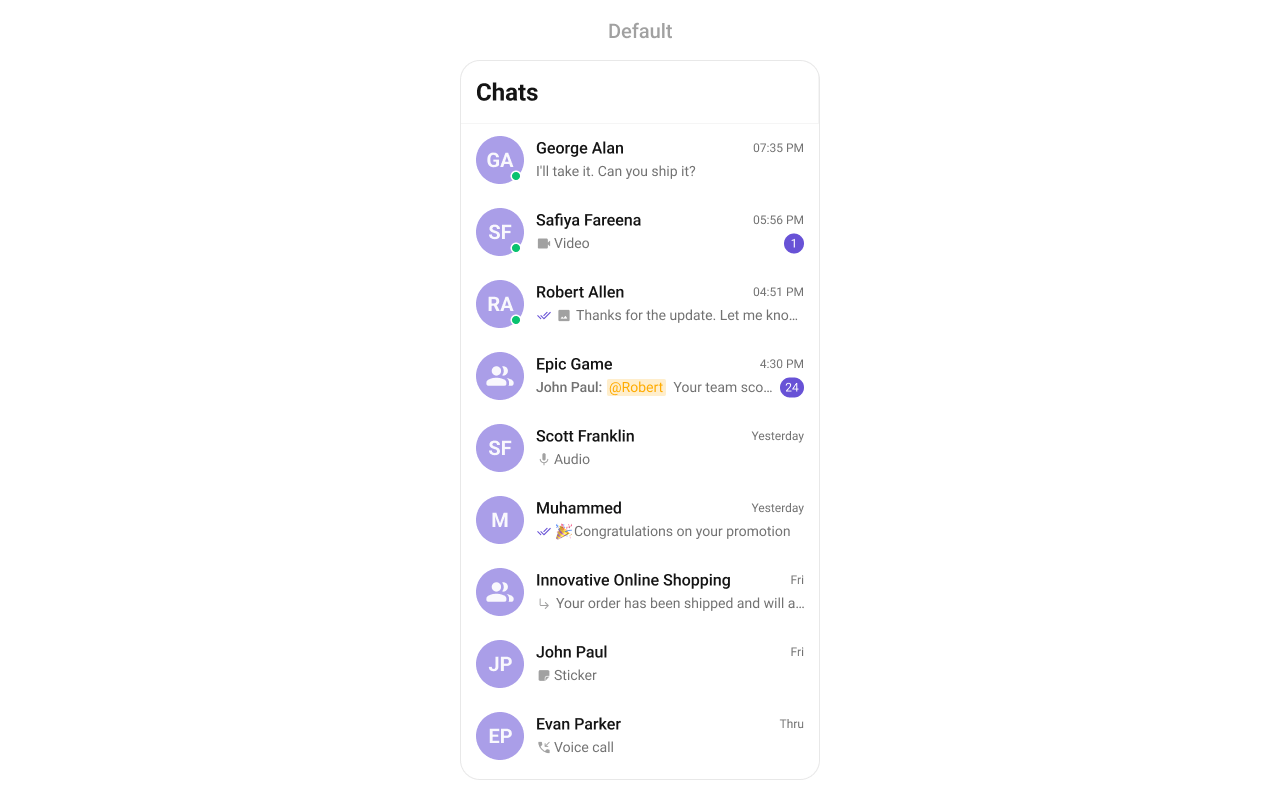 Step-by-step guide to build this layout
***
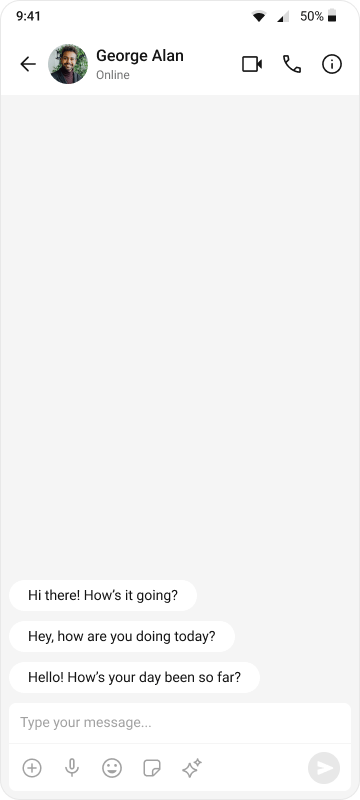
### One-to-One / Group Chat
Single chat window — no conversation list. Good for support chat or focused messaging.
Step-by-step guide to build this layout
***
### One-to-One / Group Chat
Single chat window — no conversation list. Good for support chat or focused messaging.
 Step-by-step guide to build this layout
***
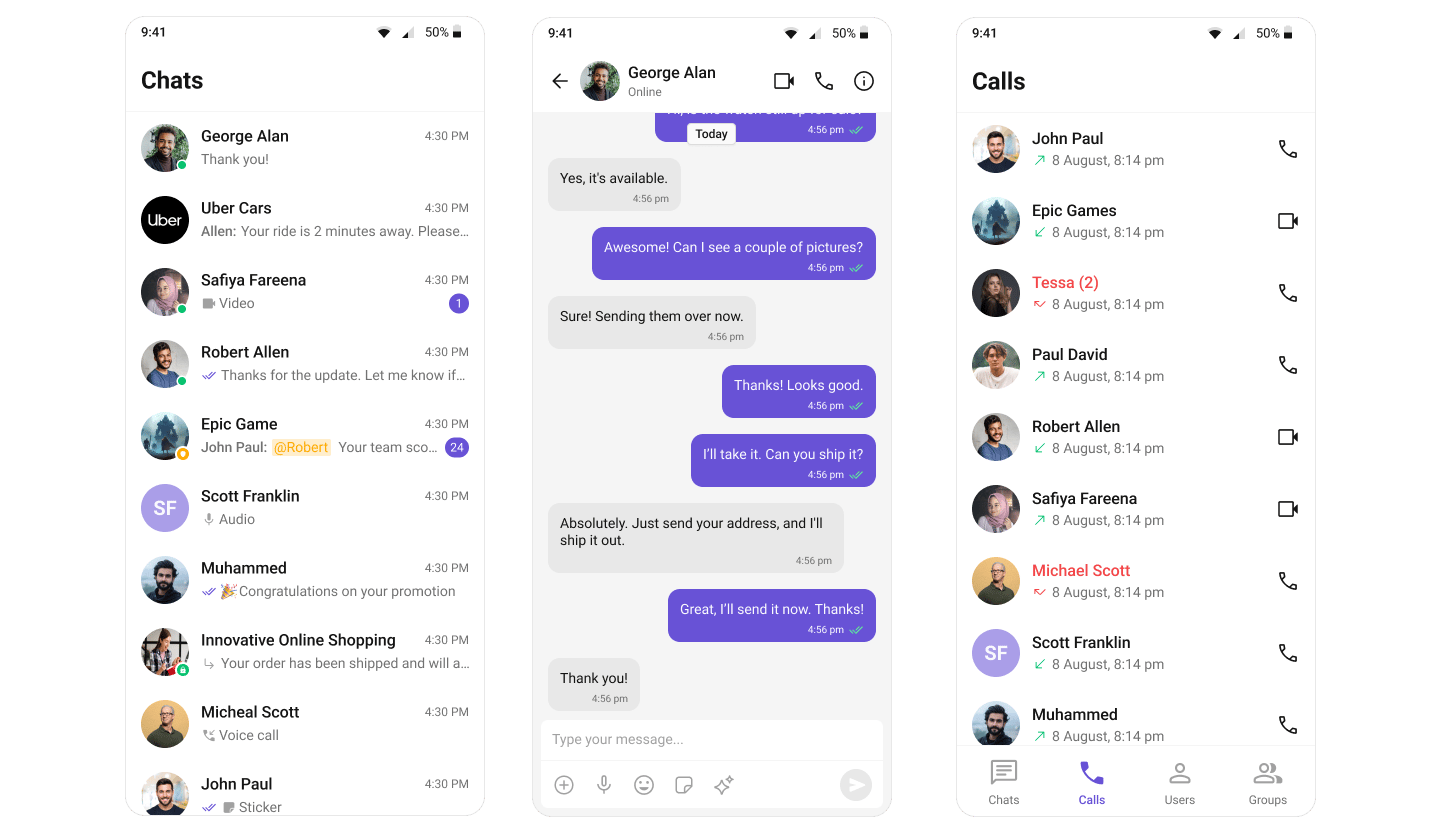
### Tab-Based Chat
Tabbed navigation — Chats, Users, Groups, Calls in separate tabs. Good for full-featured apps.
Step-by-step guide to build this layout
***
### Tab-Based Chat
Tabbed navigation — Chats, Users, Groups, Calls in separate tabs. Good for full-featured apps.
 Step-by-step guide to build this layout
***
## Running Development Builds
Since Expo Go is not supported, you need to create development builds:
```bash theme={null}
npx expo run:ios
```
```bash theme={null}
npx expo run:android
```
For more details, see the [Expo local app development guide](https://docs.expo.dev/guides/local-app-development/).
***
## Reference Implementation
For a complete working example, check out the [SampleAppExpo](https://github.com/cometchat/cometchat-uikit-react-native/tree/v5/examples/SampleAppExpo/) repository.
***
## Next Steps
Browse all prebuilt UI components
Customize colors, fonts, and styles
Chat features included out of the box
Common issues and fixes
Step-by-step guide to build this layout
***
## Running Development Builds
Since Expo Go is not supported, you need to create development builds:
```bash theme={null}
npx expo run:ios
```
```bash theme={null}
npx expo run:android
```
For more details, see the [Expo local app development guide](https://docs.expo.dev/guides/local-app-development/).
***
## Reference Implementation
For a complete working example, check out the [SampleAppExpo](https://github.com/cometchat/cometchat-uikit-react-native/tree/v5/examples/SampleAppExpo/) repository.
***
## Next Steps
Browse all prebuilt UI components
Customize colors, fonts, and styles
Chat features included out of the box
Common issues and fixes