> ## Documentation Index
> Fetch the complete documentation index at: https://cometchat-22654f5b-docs-rn-guide-message-privately.mintlify.site/llms.txt
> Use this file to discover all available pages before exploring further.
# Overview
> Overview of Overview in CometChat.
The **CometChat Swift UI Kit** lets developers integrate text chat and voice/video calling features into iOS apps seamlessly.
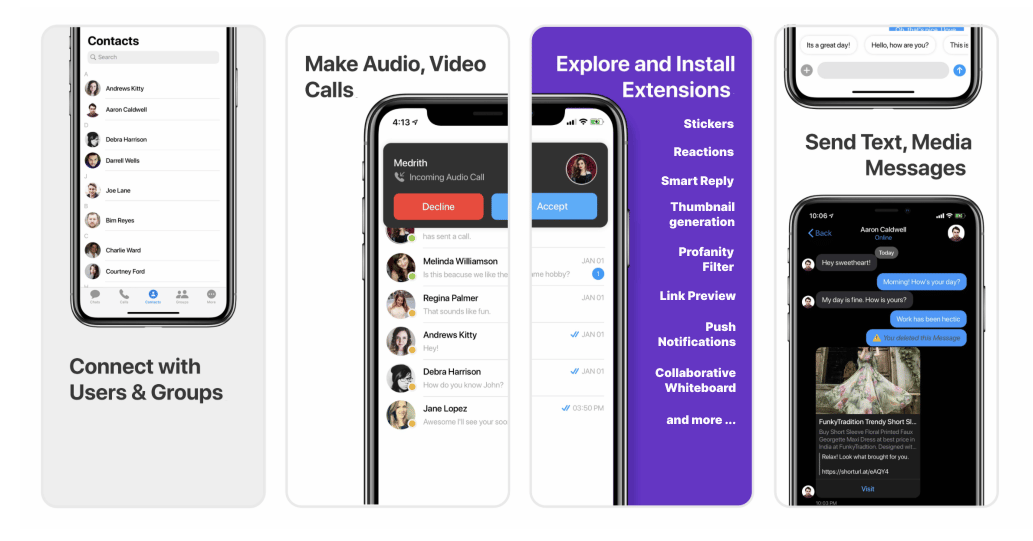 The iOS UI Kit’s **Swift UI components** are completely customizable. Included is a fully polished UI and the complete business logic. We provide the source code, which you can adapt it to fit your needs.
Follow the steps mentioned in the `README.md` file.
Kindly, click on below button to download our iOS Chat UI Kit.
[iOS Chat UI Kit](https://github.com/cometchat-pro/ios-swift-chat-ui-kit/archive/master.zip)
[View on Github](https://github.com/cometchat-pro/ios-swift-chat-ui-kit)
**I want to integrate UI Kit with my App**
* [UI Components](/ui-kit/ios/v3/ios-ui-components)
* [Customize UI Kit](/ui-kit/ios/v3/customize-ui-kit)
Import the app into Xcode and follow the steps mentioned in the `README.md` file.
Kindly, click on below button to download our Swift Sample App.
[Swift Sample App](https://github.com/cometchat-pro-samples/ios-swift-chat-app/archive/master.zip)
[View on Github](https://github.com/cometchat-pro-samples/ios-swift-chat-app)
Or else, you can also checkout our Objective-C Sample App.
[Objective-C Sample App](https://github.com/cometchat-pro-samples/ios-objective-c-chat-app/archive/master.zip)
[View on Github](https://github.com/cometchat-pro-samples/ios-objective-c-chat-app)
## Prerequisites
Before you begin, ensure you have met the following requirements:
* You have installed the **latest version of Xcode**. (Above Xcode 12 Recommended)
* Please note, CometChat's **iOS Chat UI Kit** works for iOS devices from **iOS 11 and above**.
> If you're building the new project, the please add below line in **AppDelegate.swift**> > **var window: UIWindow?**
> Please install the latest pod version on your Mac to avoid integration issues> > Please follow the below steps:> > 1. sudo gem update cocoapods --pre> 2. pod update> 3. clean> 4. build
***
## Installing the iOS Chat UI Kit
### 1. Setup 🔧
**i. Register on CometChat 🧑💻**
* To install iOS Chat UI Kit, you need to first register on **CometChat Dashboard**. [Click here to sign up](https://app.cometchat.com/login).
**ii. Get Your Application Keys 🔑**
* Create a **new app**
* Head over to the **QuickStart** or **API & Auth Keys section** and note the **App ID**, **Auth Key**, and **Region**.
**iii. Add the CometChat Dependency**📦
We recommend using CocoaPods, as they are the most advanced way of managing iOS project dependencies. Open a terminal window, move to your project directory, and then create a Podfile by running the following command
Create podfile using the below command.
```sh theme={null}
$ pod init
```
Add the following lines to the Podfile.
```sh theme={null}
For Xcode 12 and above:
platform :ios, '12.0'
use_frameworks!
target 'YourApp' do
pod 'CometChatPro', '3.0.919'
pod 'CometChatCalls', '3.0.0'
end
```
And then install the CometChat framework through CocoaPods.
```sh theme={null}
pod install
```
If you're facing any issues while installing pods then use the below command.
```sh theme={null}
pod install --repo-update
```
***
### 2. Configure CometChat inside your iOS app
**i. Initialize CometChat 🎬**
The `init()` method initializes the settings required for CometChat. We suggest calling the `init()` method on app startup, preferably in the `didFinishLaunchingWithOptions()` method of the Application class.
```swift theme={null}
import CometChatPro
class AppDelegate: UIResponder, UIApplicationDelegate{
var window: UIWindow?
let appId: String = "ENTER APP ID"
let region: String = "ENTER REGION CODE"
func application(_ application: UIApplication, didFinishLaunchingWithOptions launchOptions: [UIApplication.LaunchOptionsKey: Any]?) -> Bool {
let mySettings = AppSettings.AppSettingsBuilder().subscribePresenceForAllUsers().setRegion(region: region).build()
CometChat(appId: appId ,appSettings: mySettings,onSuccess: { (isSuccess) in
print("CometChat Pro SDK intialise successfully.")
}) { (error) in
print("CometChat Pro SDK failed intialise with error: \\(error.errorDescription)")
}
return true
}
}
```
> Make sure you replace the **appId** with your CometChat *appId* and *region* with your app region in the above code.
**ii. Create User** 🐣
This method takes a `User` object and the `Auth Key` as input parameters and returns the created `User` object if the request is successful.
```swift theme={null}
let uid = "user1"
let name = "Kevin"
let authKey = "AUTH_KEY"
let newUser : User = User(uid: uid, name: name)
newUser.avatar = "ENTER AVATAR URL HERE"
CometChat.createUser(user: newUser, apiKey: authKey, onSuccess: { (User) in
print("User created successfully. \\(User.stringValue())")
}) { (error) in
print("The error is \\(String(describing: error?.description))")
}
```
**ii. Log in your User**👤
The `login()` method returns the User object containing all the information of the `logged-in user.`
```swift theme={null}
let uid = "cometchat-uid-1"
let authKey = "ENTER AUTH KEY"
CometChat.login(UID: uid, apiKey: authKey, onSuccess: { (user) in
print("Login successful: " + user.stringValue())
}) { (error) in
print("Login failed with error: " + error.errorDescription);
}
```
> * Make sure you replace the authKey with your CometChat Auth Key in the above code.> - We have set up 5 users for testing having UIDs: cometchat-uid-1, cometchat-uid-2, cometchat-uid-3, cometchat-uid-4, and cometchat-uid-5.
***
### 3. Add Swift Chat UI Kit to your project
To integrate **Swift Chat UI Kit** inside your app. Kindly follow the below steps:
i. Simply **clone the UIKit Library** from the below repository.
```sh theme={null}
git clone https:__github.com_cometchat-pro_ios-swift-chat-ui-kit.git
```
ii. After cloning the repository, Navigate to the `Library` folder and drag and drop the `Library` folder inside your project's folder.
The iOS UI Kit’s **Swift UI components** are completely customizable. Included is a fully polished UI and the complete business logic. We provide the source code, which you can adapt it to fit your needs.
Follow the steps mentioned in the `README.md` file.
Kindly, click on below button to download our iOS Chat UI Kit.
[iOS Chat UI Kit](https://github.com/cometchat-pro/ios-swift-chat-ui-kit/archive/master.zip)
[View on Github](https://github.com/cometchat-pro/ios-swift-chat-ui-kit)
**I want to integrate UI Kit with my App**
* [UI Components](/ui-kit/ios/v3/ios-ui-components)
* [Customize UI Kit](/ui-kit/ios/v3/customize-ui-kit)
Import the app into Xcode and follow the steps mentioned in the `README.md` file.
Kindly, click on below button to download our Swift Sample App.
[Swift Sample App](https://github.com/cometchat-pro-samples/ios-swift-chat-app/archive/master.zip)
[View on Github](https://github.com/cometchat-pro-samples/ios-swift-chat-app)
Or else, you can also checkout our Objective-C Sample App.
[Objective-C Sample App](https://github.com/cometchat-pro-samples/ios-objective-c-chat-app/archive/master.zip)
[View on Github](https://github.com/cometchat-pro-samples/ios-objective-c-chat-app)
## Prerequisites
Before you begin, ensure you have met the following requirements:
* You have installed the **latest version of Xcode**. (Above Xcode 12 Recommended)
* Please note, CometChat's **iOS Chat UI Kit** works for iOS devices from **iOS 11 and above**.
> If you're building the new project, the please add below line in **AppDelegate.swift**> > **var window: UIWindow?**
> Please install the latest pod version on your Mac to avoid integration issues> > Please follow the below steps:> > 1. sudo gem update cocoapods --pre> 2. pod update> 3. clean> 4. build
***
## Installing the iOS Chat UI Kit
### 1. Setup 🔧
**i. Register on CometChat 🧑💻**
* To install iOS Chat UI Kit, you need to first register on **CometChat Dashboard**. [Click here to sign up](https://app.cometchat.com/login).
**ii. Get Your Application Keys 🔑**
* Create a **new app**
* Head over to the **QuickStart** or **API & Auth Keys section** and note the **App ID**, **Auth Key**, and **Region**.
**iii. Add the CometChat Dependency**📦
We recommend using CocoaPods, as they are the most advanced way of managing iOS project dependencies. Open a terminal window, move to your project directory, and then create a Podfile by running the following command
Create podfile using the below command.
```sh theme={null}
$ pod init
```
Add the following lines to the Podfile.
```sh theme={null}
For Xcode 12 and above:
platform :ios, '12.0'
use_frameworks!
target 'YourApp' do
pod 'CometChatPro', '3.0.919'
pod 'CometChatCalls', '3.0.0'
end
```
And then install the CometChat framework through CocoaPods.
```sh theme={null}
pod install
```
If you're facing any issues while installing pods then use the below command.
```sh theme={null}
pod install --repo-update
```
***
### 2. Configure CometChat inside your iOS app
**i. Initialize CometChat 🎬**
The `init()` method initializes the settings required for CometChat. We suggest calling the `init()` method on app startup, preferably in the `didFinishLaunchingWithOptions()` method of the Application class.
```swift theme={null}
import CometChatPro
class AppDelegate: UIResponder, UIApplicationDelegate{
var window: UIWindow?
let appId: String = "ENTER APP ID"
let region: String = "ENTER REGION CODE"
func application(_ application: UIApplication, didFinishLaunchingWithOptions launchOptions: [UIApplication.LaunchOptionsKey: Any]?) -> Bool {
let mySettings = AppSettings.AppSettingsBuilder().subscribePresenceForAllUsers().setRegion(region: region).build()
CometChat(appId: appId ,appSettings: mySettings,onSuccess: { (isSuccess) in
print("CometChat Pro SDK intialise successfully.")
}) { (error) in
print("CometChat Pro SDK failed intialise with error: \\(error.errorDescription)")
}
return true
}
}
```
> Make sure you replace the **appId** with your CometChat *appId* and *region* with your app region in the above code.
**ii. Create User** 🐣
This method takes a `User` object and the `Auth Key` as input parameters and returns the created `User` object if the request is successful.
```swift theme={null}
let uid = "user1"
let name = "Kevin"
let authKey = "AUTH_KEY"
let newUser : User = User(uid: uid, name: name)
newUser.avatar = "ENTER AVATAR URL HERE"
CometChat.createUser(user: newUser, apiKey: authKey, onSuccess: { (User) in
print("User created successfully. \\(User.stringValue())")
}) { (error) in
print("The error is \\(String(describing: error?.description))")
}
```
**ii. Log in your User**👤
The `login()` method returns the User object containing all the information of the `logged-in user.`
```swift theme={null}
let uid = "cometchat-uid-1"
let authKey = "ENTER AUTH KEY"
CometChat.login(UID: uid, apiKey: authKey, onSuccess: { (user) in
print("Login successful: " + user.stringValue())
}) { (error) in
print("Login failed with error: " + error.errorDescription);
}
```
> * Make sure you replace the authKey with your CometChat Auth Key in the above code.> - We have set up 5 users for testing having UIDs: cometchat-uid-1, cometchat-uid-2, cometchat-uid-3, cometchat-uid-4, and cometchat-uid-5.
***
### 3. Add Swift Chat UI Kit to your project
To integrate **Swift Chat UI Kit** inside your app. Kindly follow the below steps:
i. Simply **clone the UIKit Library** from the below repository.
```sh theme={null}
git clone https:__github.com_cometchat-pro_ios-swift-chat-ui-kit.git
```
ii. After cloning the repository, Navigate to the `Library` folder and drag and drop the `Library` folder inside your project's folder.
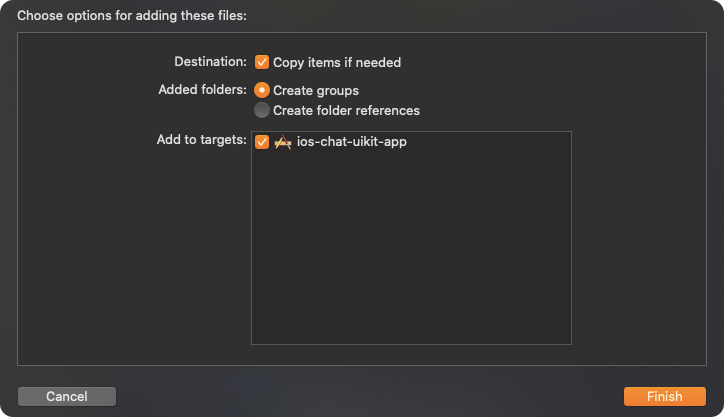 iii. Make sure you've selected ✅ Copy items if needed as well as 🔘 Create group options while adding a \`Library inside your project.
iv. If the Library is added successfully, all added folders will be in Yellow color.
***
### 4. Launch CometChat
iii. Make sure you've selected ✅ Copy items if needed as well as 🔘 Create group options while adding a \`Library inside your project.
iv. If the Library is added successfully, all added folders will be in Yellow color.
***
### 4. Launch CometChat
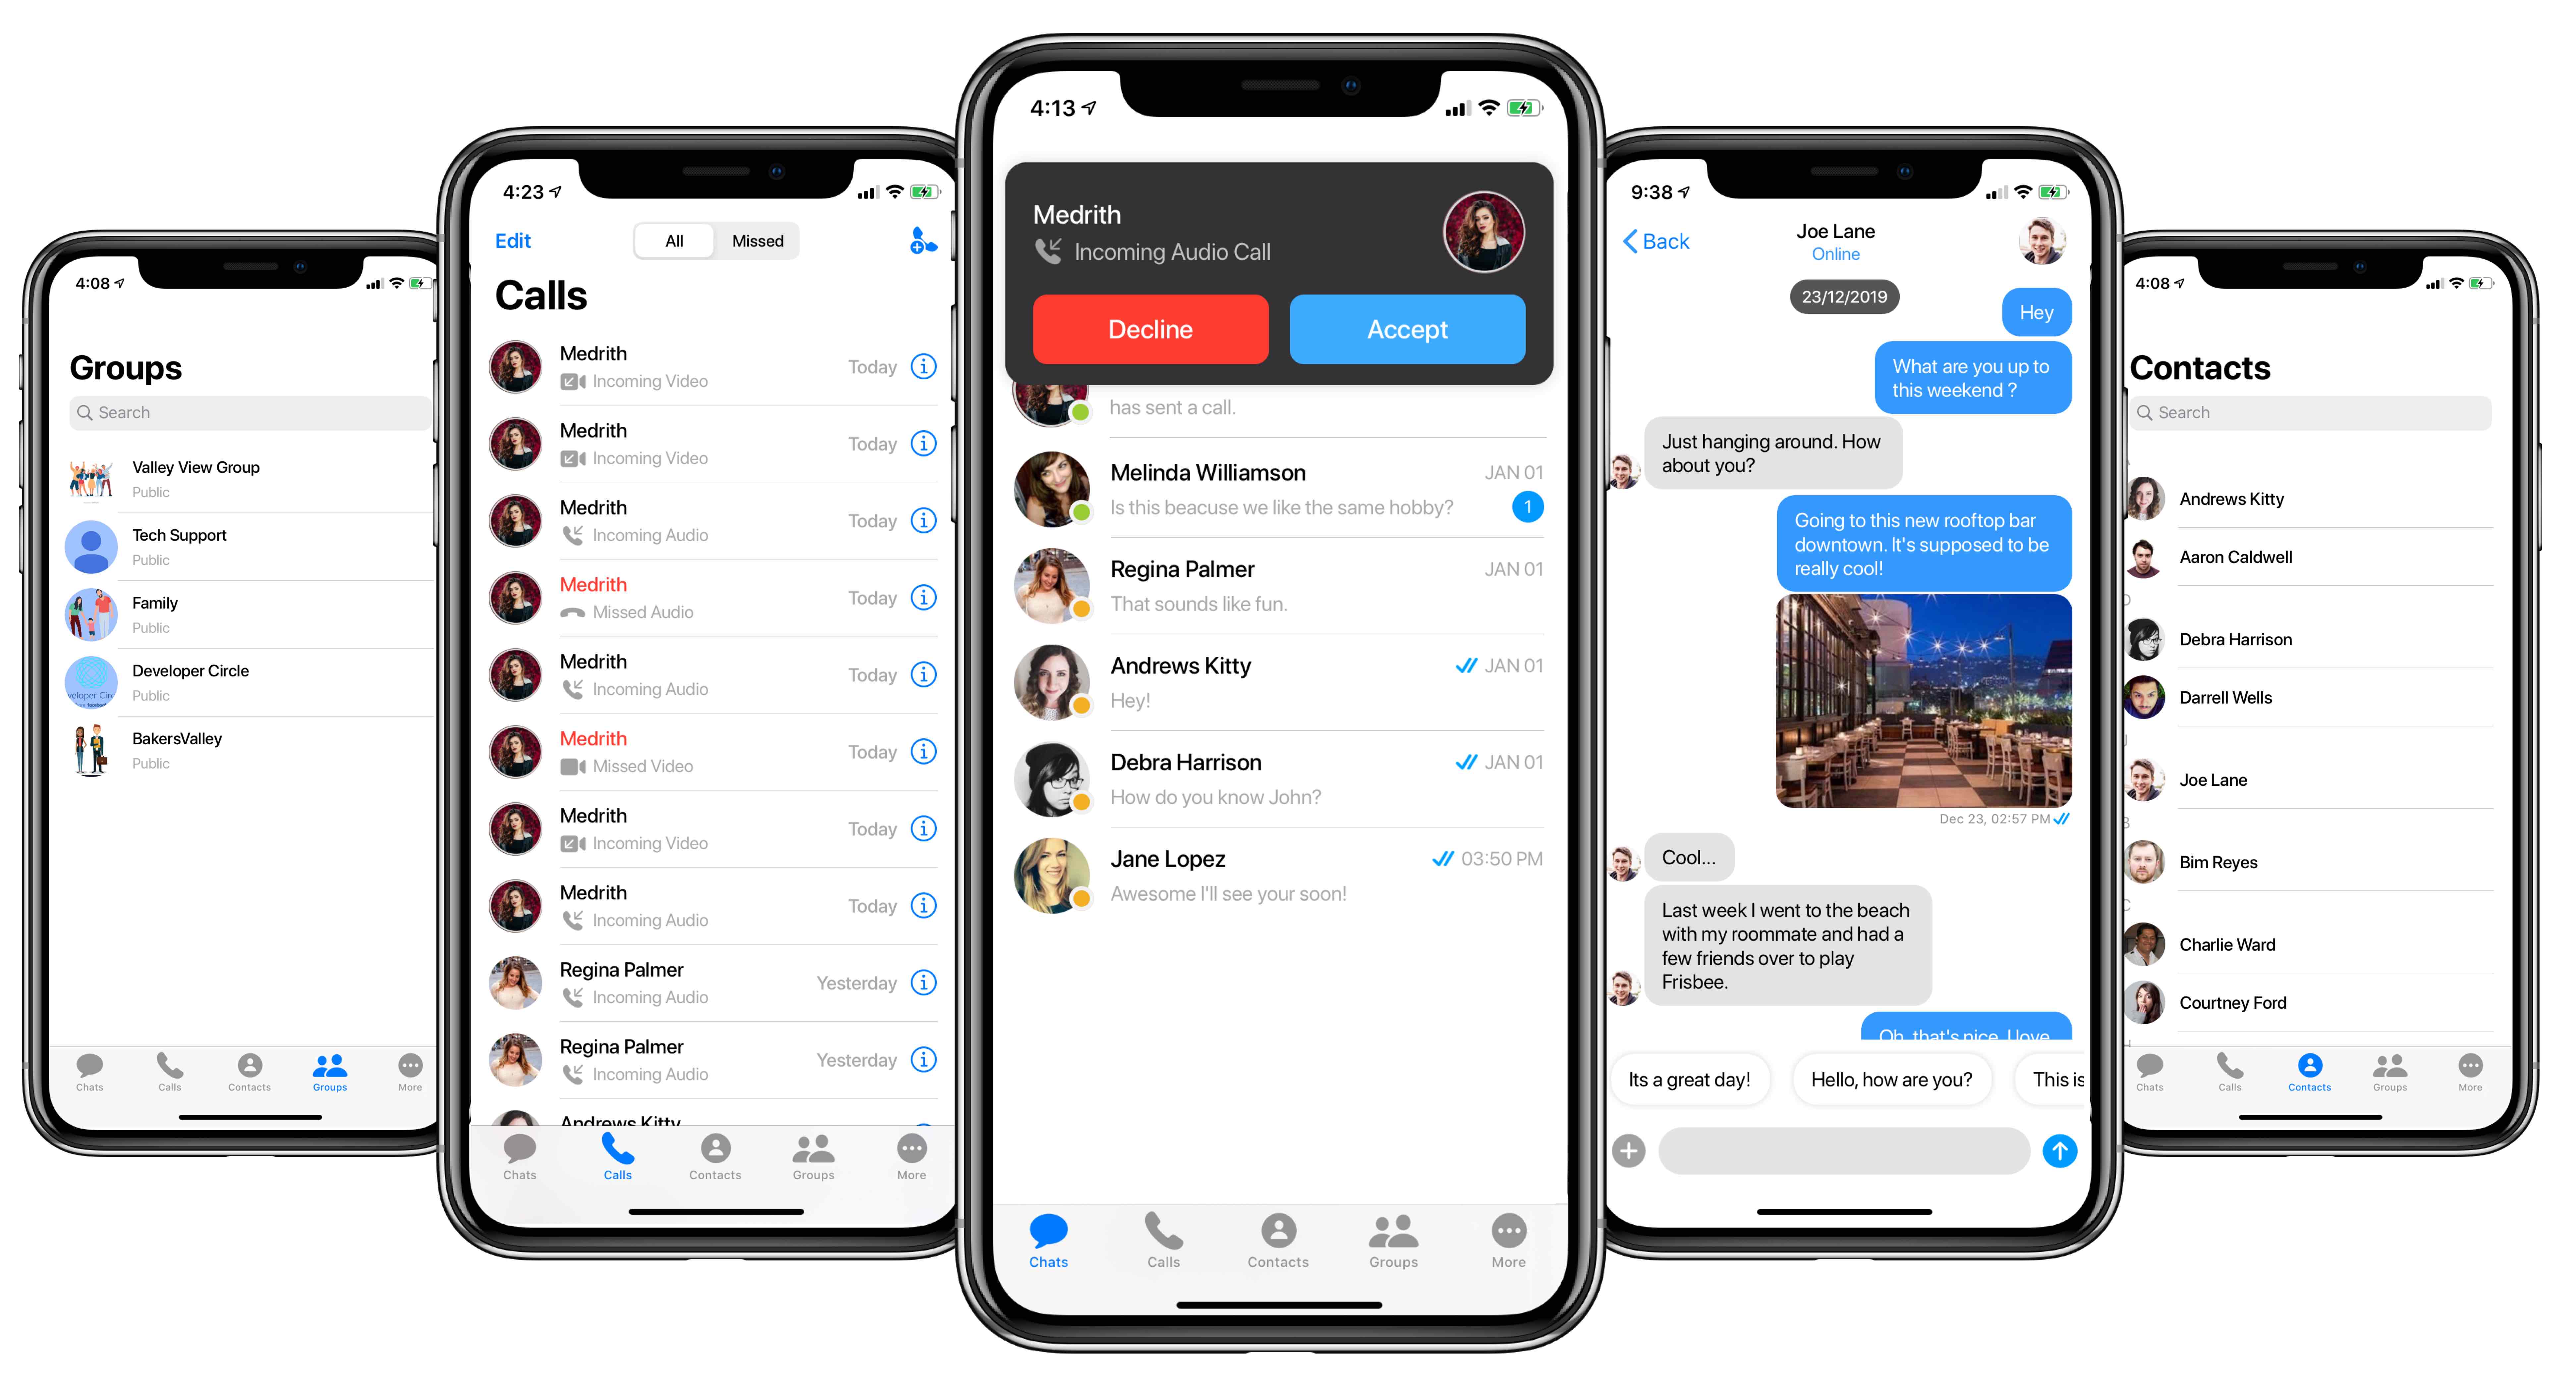 CometChatUI is an option to launch a fully functional chat application using the Swift Chat UI Kit. In the iOS UI Kit all the Swift UI Components are interlinked and work together to launch a fully functional chat on your website/application.
To use **CometChatUI** user has to launch `CometChatUI` class. **CometChatUI** is a subclass of UITabbarController.
```swift theme={null}
DispatchQueue.main.async {
let cometChatUI = CometChatUI()
cometChatUI.setup(withStyle: .fullScreen)
self.present(cometChatUI, animated: true, completion: nil)
}
```
> Please run the above code snippet in the main thread.
***
### 5. Receive Real-time calls (Optional)
To receive real-time call events when the app is in foreground, the user has to register for them in the **App Delegate** class.
```swift theme={null}
CometChatCallManager().registerForCalls(application: self)
```
> * **This method only allows user to launch the incoming call screen and other calling events when the app is in foreground mode.**
CometChatUI is an option to launch a fully functional chat application using the Swift Chat UI Kit. In the iOS UI Kit all the Swift UI Components are interlinked and work together to launch a fully functional chat on your website/application.
To use **CometChatUI** user has to launch `CometChatUI` class. **CometChatUI** is a subclass of UITabbarController.
```swift theme={null}
DispatchQueue.main.async {
let cometChatUI = CometChatUI()
cometChatUI.setup(withStyle: .fullScreen)
self.present(cometChatUI, animated: true, completion: nil)
}
```
> Please run the above code snippet in the main thread.
***
### 5. Receive Real-time calls (Optional)
To receive real-time call events when the app is in foreground, the user has to register for them in the **App Delegate** class.
```swift theme={null}
CometChatCallManager().registerForCalls(application: self)
```
> * **This method only allows user to launch the incoming call screen and other calling events when the app is in foreground mode.**