> ## Documentation Index
> Fetch the complete documentation index at: https://cometchat-22654f5b-docs-rn-guide-message-privately.mintlify.site/llms.txt
> Use this file to discover all available pages before exploring further.
# Tab-Based Chat
> Build a tab-based messaging UI with chats, calls, users, and groups in Flutter with CometChat UI Kit.
| Field | Value |
| ------------ | ---------------------------------------------------------------------------------------------------------------------------------------------------------------- |
| Package | `cometchat_chat_uikit` |
| Framework | Flutter |
| Components | `CometChatConversations`, `CometChatCallLogs`, `CometChatUsers`, `CometChatGroups`, `CometChatMessageHeader`, `CometChatMessageList`, `CometChatMessageComposer` |
| Layout | Bottom navigation tabs (Chats, Calls, Users, Groups) + message view |
| Prerequisite | Complete [Getting Started](/ui-kit/flutter/v5/getting-started) Steps 1–4 first |
| Pattern | Full-featured messaging app with multiple sections |
This guide builds a tabbed messaging UI — Chats, Calls, Users, and Groups tabs with bottom navigation. Good for full-featured apps that need more than just conversations.
This assumes you've already completed [Getting Started](/ui-kit/flutter/v5/getting-started) (project created, UI Kit installed, init + login working).
 [View Sample App on GitHub](https://github.com/cometchat/cometchat-uikit-flutter/tree/v5/sample_app)
***
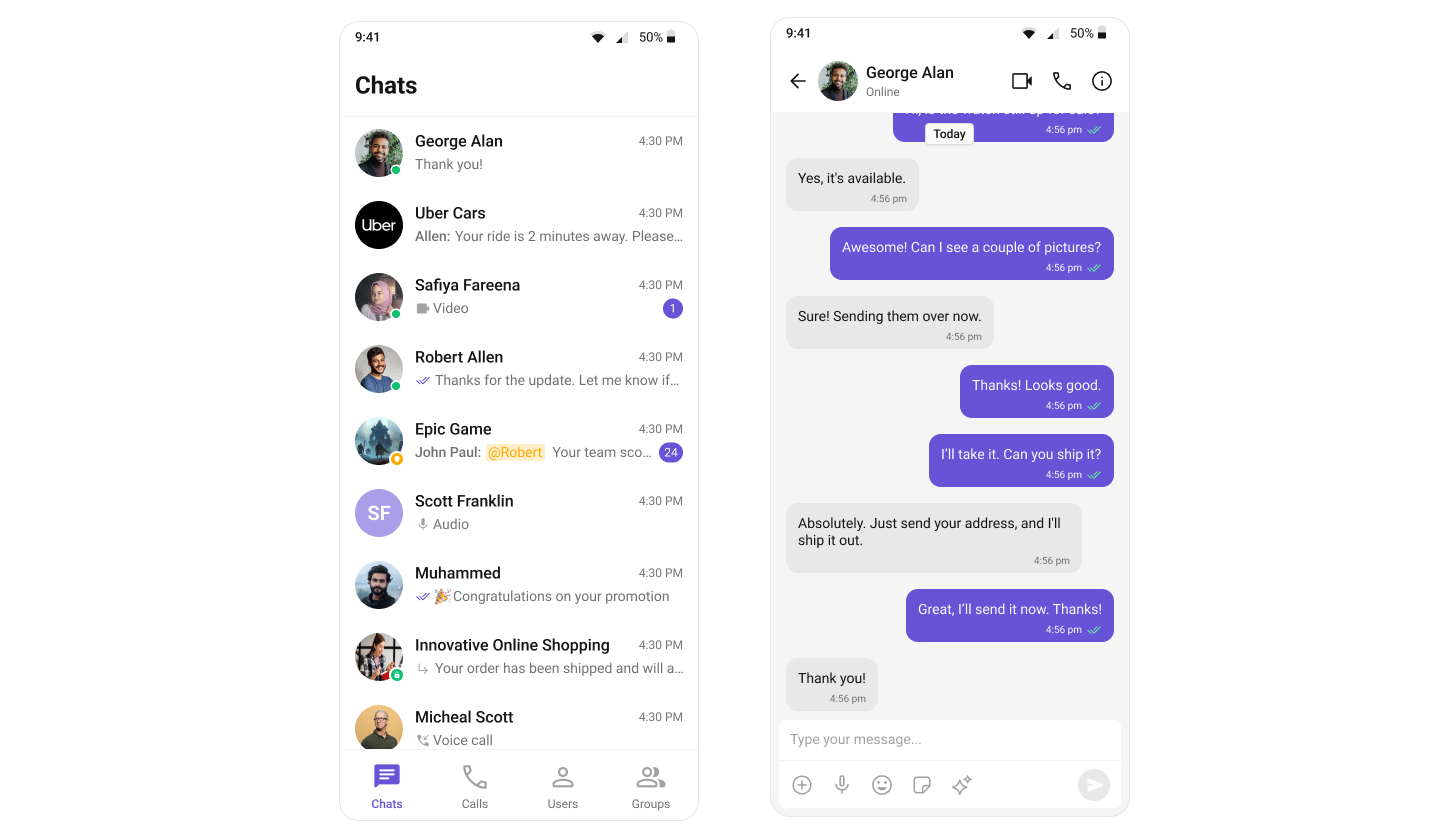
## What You're Building
Three sections working together:
1. **Bottom navigation** — switches between Chats, Calls, Users, and Groups
2. **Page view** — renders the list for the active tab
3. **Message view** — header + messages + composer for the selected item
***
## Step 1 — Create the Tabs Screen
The tabs screen uses `BottomNavigationBar` and `PageView` to create a tabbed interface.
```dart title="lib/tabs_screen.dart" theme={null}
import 'package:flutter/material.dart';
import 'package:cometchat_chat_uikit/cometchat_chat_uikit.dart';
import 'package:cometchat_calls_uikit/cometchat_calls_uikit.dart';
import 'messages_screen.dart';
class TabsScreen extends StatefulWidget {
const TabsScreen({super.key});
@override
State createState() => _TabsScreenState();
}
class _TabsScreenState extends State {
int _selectedIndex = 0;
final PageController _pageController = PageController();
void _onItemTapped(int index) {
setState(() => _selectedIndex = index);
_pageController.jumpToPage(index);
}
@override
void dispose() {
_pageController.dispose();
super.dispose();
}
@override
Widget build(BuildContext context) {
return Scaffold(
body: PageView(
controller: _pageController,
onPageChanged: (index) => setState(() => _selectedIndex = index),
children: [
CometChatConversations(
onItemTap: (conversation) {
final target = conversation.conversationWith;
Navigator.push(
context,
MaterialPageRoute(
builder: (_) => MessagesScreen(
user: target is User ? target : null,
group: target is Group ? target : null,
),
),
);
},
),
CometChatCallLogs(),
CometChatUsers(
onItemTap: (user) => Navigator.push(
context,
MaterialPageRoute(builder: (_) => MessagesScreen(user: user)),
),
),
CometChatGroups(
onItemTap: (group) => Navigator.push(
context,
MaterialPageRoute(builder: (_) => MessagesScreen(group: group)),
),
),
],
),
bottomNavigationBar: BottomNavigationBar(
type: BottomNavigationBarType.fixed,
currentIndex: _selectedIndex,
onTap: _onItemTapped,
selectedItemColor: Colors.deepPurple,
unselectedItemColor: Colors.grey,
items: const [
BottomNavigationBarItem(icon: Icon(Icons.chat), label: "Chats"),
BottomNavigationBarItem(icon: Icon(Icons.call), label: "Calls"),
BottomNavigationBarItem(icon: Icon(Icons.person), label: "Users"),
BottomNavigationBarItem(icon: Icon(Icons.group), label: "Groups"),
],
),
);
}
}
```
Key points:
* `PageView` enables swipeable pages for each tab.
* `BottomNavigationBar` provides quick access to different sections.
* Each list component navigates to `MessagesScreen` on item tap.
***
## Step 2 — Create the Messages Screen
Same as the [Conversation + Message](/ui-kit/flutter/v5/flutter-conversation) guide:
```dart title="lib/messages_screen.dart" theme={null}
import 'package:flutter/material.dart';
import 'package:cometchat_chat_uikit/cometchat_chat_uikit.dart';
class MessagesScreen extends StatelessWidget {
final User? user;
final Group? group;
const MessagesScreen({super.key, this.user, this.group});
@override
Widget build(BuildContext context) {
return Scaffold(
appBar: CometChatMessageHeader(user: user, group: group),
body: SafeArea(
child: Column(
children: [
Expanded(child: CometChatMessageList(user: user, group: group)),
CometChatMessageComposer(user: user, group: group),
],
),
),
);
}
}
```
***
## Step 3 — Run the App
```bash theme={null}
flutter run
```
You should see the tab bar at the bottom. Switch between Chats, Calls, Users, and Groups — tapping any item opens the message view.
***
## Tab Descriptions
| Tab | Component | Purpose |
| ------ | ------------------------ | --------------------------------------- |
| Chats | `CometChatConversations` | Recent conversations with unread counts |
| Calls | `CometChatCallLogs` | Call history (audio/video) |
| Users | `CometChatUsers` | Browse and search all users |
| Groups | `CometChatGroups` | Browse and join groups |
***
## Next Steps
Customize the conversation list
Configure call history
Manage user and group lists
Customize colors and styles
[View Sample App on GitHub](https://github.com/cometchat/cometchat-uikit-flutter/tree/v5/sample_app)
***
## What You're Building
Three sections working together:
1. **Bottom navigation** — switches between Chats, Calls, Users, and Groups
2. **Page view** — renders the list for the active tab
3. **Message view** — header + messages + composer for the selected item
***
## Step 1 — Create the Tabs Screen
The tabs screen uses `BottomNavigationBar` and `PageView` to create a tabbed interface.
```dart title="lib/tabs_screen.dart" theme={null}
import 'package:flutter/material.dart';
import 'package:cometchat_chat_uikit/cometchat_chat_uikit.dart';
import 'package:cometchat_calls_uikit/cometchat_calls_uikit.dart';
import 'messages_screen.dart';
class TabsScreen extends StatefulWidget {
const TabsScreen({super.key});
@override
State createState() => _TabsScreenState();
}
class _TabsScreenState extends State {
int _selectedIndex = 0;
final PageController _pageController = PageController();
void _onItemTapped(int index) {
setState(() => _selectedIndex = index);
_pageController.jumpToPage(index);
}
@override
void dispose() {
_pageController.dispose();
super.dispose();
}
@override
Widget build(BuildContext context) {
return Scaffold(
body: PageView(
controller: _pageController,
onPageChanged: (index) => setState(() => _selectedIndex = index),
children: [
CometChatConversations(
onItemTap: (conversation) {
final target = conversation.conversationWith;
Navigator.push(
context,
MaterialPageRoute(
builder: (_) => MessagesScreen(
user: target is User ? target : null,
group: target is Group ? target : null,
),
),
);
},
),
CometChatCallLogs(),
CometChatUsers(
onItemTap: (user) => Navigator.push(
context,
MaterialPageRoute(builder: (_) => MessagesScreen(user: user)),
),
),
CometChatGroups(
onItemTap: (group) => Navigator.push(
context,
MaterialPageRoute(builder: (_) => MessagesScreen(group: group)),
),
),
],
),
bottomNavigationBar: BottomNavigationBar(
type: BottomNavigationBarType.fixed,
currentIndex: _selectedIndex,
onTap: _onItemTapped,
selectedItemColor: Colors.deepPurple,
unselectedItemColor: Colors.grey,
items: const [
BottomNavigationBarItem(icon: Icon(Icons.chat), label: "Chats"),
BottomNavigationBarItem(icon: Icon(Icons.call), label: "Calls"),
BottomNavigationBarItem(icon: Icon(Icons.person), label: "Users"),
BottomNavigationBarItem(icon: Icon(Icons.group), label: "Groups"),
],
),
);
}
}
```
Key points:
* `PageView` enables swipeable pages for each tab.
* `BottomNavigationBar` provides quick access to different sections.
* Each list component navigates to `MessagesScreen` on item tap.
***
## Step 2 — Create the Messages Screen
Same as the [Conversation + Message](/ui-kit/flutter/v5/flutter-conversation) guide:
```dart title="lib/messages_screen.dart" theme={null}
import 'package:flutter/material.dart';
import 'package:cometchat_chat_uikit/cometchat_chat_uikit.dart';
class MessagesScreen extends StatelessWidget {
final User? user;
final Group? group;
const MessagesScreen({super.key, this.user, this.group});
@override
Widget build(BuildContext context) {
return Scaffold(
appBar: CometChatMessageHeader(user: user, group: group),
body: SafeArea(
child: Column(
children: [
Expanded(child: CometChatMessageList(user: user, group: group)),
CometChatMessageComposer(user: user, group: group),
],
),
),
);
}
}
```
***
## Step 3 — Run the App
```bash theme={null}
flutter run
```
You should see the tab bar at the bottom. Switch between Chats, Calls, Users, and Groups — tapping any item opens the message view.
***
## Tab Descriptions
| Tab | Component | Purpose |
| ------ | ------------------------ | --------------------------------------- |
| Chats | `CometChatConversations` | Recent conversations with unread counts |
| Calls | `CometChatCallLogs` | Call history (audio/video) |
| Users | `CometChatUsers` | Browse and search all users |
| Groups | `CometChatGroups` | Browse and join groups |
***
## Next Steps
Customize the conversation list
Configure call history
Manage user and group lists
Customize colors and styles